Introduction: Unleashing the Power of DeepSeek in the Cloud
In today's era of blossoming open-source large language models, the DeepSeek series of models developed by DeepSeek AI is undoubtedly a shining star. It is not just an ordinary conversational model, but a meticulously designed AI giant with top-tier performance in specific domains. DeepSeek is renowned in the developer community for its exceptional code generation capabilities, able to understand complex programming logic and produce high-quality, executable code. At the same time, it also demonstrates astonishing prowess in mathematical reasoning and logical analysis, making it a powerful assistant for solving complex problems.
As an open-source model, DeepSeek grants developers unprecedented freedom, but this freedom comes with challenges. Advanced models like DeepSeek V3.1, with their hundreds of billions of parameters, have immense computational resource requirements behind them. To run it smoothly and perform real-time inference, ordinary consumer-grade hardware is far from sufficient; it requires professional-grade GPUs with massive VRAM and powerful parallel computing capabilities, such as the NVIDIA A100 or H100. For most developers and small to medium-sized teams, acquiring and maintaining such hardware is a huge cost and technical barrier.
This is precisely where an AI cloud computing platform like RunC.AI plays a key role. RunC.AI focuses on providing flexible, efficient, and cost-effective GPU computing services for artificial intelligence developers. It bridges the gap between top-tier hardware and developers, allowing anyone to rent world-class GPU resources on demand. Thus, RunC.AI and DeepSeek form a perfect symbiotic relationship: RunC.AI provides the robust "soil" and "power engine," while DeepSeek is the "seed of wisdom" that needs to take root, sprout, and thrive in this fertile ground.
This tutorial will guide you in detail through the entire process from scratch. We will utilize the powerful GPU instances of the RunC.AI platform, step-by-step complete all necessary software installation and configuration, and finally successfully deploy the DeepSeek V3.1 model, building a feature-rich, interactive, and user-friendly Open WebUI interface for it. After completing this tutorial, you will have a completely private, self-controlled, high-performance AI assistant.
Complete Tutorial for Deploying the DeepSeek V3.1 Large Model on RunC.AI
This tutorial will guide you through the entire process from creating a cloud host to deploying an interactive WebUI.
Step 1: Create and Configure a GPU Cloud Host
1. Log in to RunC.AI and select an image
a. Log in to your RunC.AI account.
b. In the left navigation bar, click Explore.
c. In the VM Images module, find and select ubuntu-22.04-GPU-runcai-ubun.... This image comes pre-installed with NVIDIA drivers on an Ubuntu system, which saves us the trouble of manual driver installation.
2. Select GPU Model
a. For deploying a large model like DeepSeek V3.1, the A100 GPU is recommended because it has sufficient VRAM.
b. If the A100 is "Sold out", you can choose another available high-performance GPU, such as the RTX 4090 shown in the screenshot. Please note that if the model is too large, the 24GB of VRAM on the RTX 4090 may not be sufficient to run the highest-parameter version, but it is adequate for most models.
3. Confirm configuration and deploy
a. After selecting the GPU, the Order Summary will be displayed at the bottom of the page.
b. Here, confirm your configuration (such as GPU Cost, Disk Cost, etc.) and the Billing Cycle.
c. After confirming everything is correct, click the Deploy button. The system will then begin creating this cloud host for you.
Step 2: Connect to Your Cloud Host via SSH
1. Obtain connection information
a. After successful deployment, click on the Instances menu on the left.
b. Find the instance you just created and click the Connect button on its right.
2. Connect to the terminal
a. In the pop-up Connect to Instance window, you will see all the necessary connection information.
b. Click on connect to terminal.
c. Operation Steps:
i. The terminal will prompt for the first time: Are you sure you want to continue connecting (yes/no/[fingerprint])?, type yes and press Enter.
ii. Next, it will prompt for a password. Go back to the RunC.AI connection window, click the small icon next to the password field to copy the password, and then paste it into your terminal. Note: When you input the password, the screen will not display anything; this is normal. After pasting, press Enter directly.
d. When you see the "Welcome to Ubuntu..." welcome message, it means you have successfully logged into the command-line interface of the cloud host.
Step 3: Install and Configure Ollama
Ollama is a tool that allows you to easily run large language models.
1. One-click Installation of Ollama
a. In the SSH terminal, execute the following command to download and run Ollama's official installation script.
curl -fsSL https://ollama.com/install.sh | shb. After the installation is complete, you will see the message >>> NVIDIA GPU ready, which indicates that Ollama has successfully recognized and configured the GPU.
2. Modify the configuration to allow external access
a. In order for the subsequent WebUI to be able to connect to Ollama, we need to modify its service configuration.
b. Use the vim editor to open the configuration file.
sudo vim /etc/systemd/system/ollama.servicec. Simple guide to using the Vim editor:
i. After opening the file, press the i key on your keyboard to enter "Insert Mode".
ii. Use the arrow keys to move the cursor below the [Service] block and add a new line.
iii. Enter the following content: Environment="OLLAMA_HOST=0.0.0.0:11434"
Environment="OLLAMA_HOST=0.0.0.0:11434"iv. Press the Esc key in the upper left corner of the keyboard to exit "Insert Mode".
v. Type :wq and then press Enter; this will save your changes and exit the editor.
3. Restart the Ollama service
a. Execute the following two commands to make the new configuration take effect.
sudo systemctl daemon-reloadsudo systemctl restart ollamaStep 4: Pull the DeepSeek Large Model
Now, let Ollama download and prepare DeepSeek v3.1.
ollama run deepseek-v3.1:671b(After executing this command, Ollama will start downloading the model, which will take some time. Once the download is complete, you can chat with it directly in the terminal. Press /bye to exit.)
Step 5: Install Docker and NVIDIA Container Toolkit
This is a prerequisite for deploying the WebUI, with the purpose of allowing Docker containers to use the host's GPU.
1. Install Docker
sudo apt-get updatesudo apt-get install -y docker.iosudo systemctl start dockersudo systemctl enable docker2. Install NVIDIA Container Toolkit
a. Follow the steps in the official NVIDIA documentation and execute the following commands in order.
curl -fsSL https://nvidia.github.io/libnvidia-container/gpgkey | sudo gpg --dearmor -o /usr/share/keyrings/nvidia-container-toolkit-keyring.gpg \ && curl -s -L https://nvidia.github.io/libnvidia-container/stable/deb/nvidia-container-toolkit.list | \ sed 's#deb https://#deb [signed-by=/usr/share/keyrings/nvidia-container-toolkit-keyring.gpg] https://#g' | \ sudo tee /etc/apt/sources.list.d/nvidia-container-toolkit.listsudo apt-get updatesudo apt-get install -y nvidia-container-toolkitsudo nvidia-ctk runtime configure --runtime=dockersudo systemctl restart dockerStep 6: Deploy Open WebUI
Now, we will use Docker to run this interactive Open WebUI interface.
1. Pull the Open WebUI Image
sudo docker pull ghcr.io/open-webui/open-webui:cuda2. Run the Open WebUI Container
a. Execute the following command to start the WebUI service.
docker run -d --network=host \-v open-webui:/app/backend/data \-e OLLAMA_BASE_URL=http://127.0.0.1:11434 \--name open-webui --restart always \ghcr.io/open-webui/open-webui:cudaStep 7: Access and Start Using
1. Get your public IP address
a. Go back to the RunC.AI Instances page, where you can find the public IP address in your instance information.
2. Open the WebUI
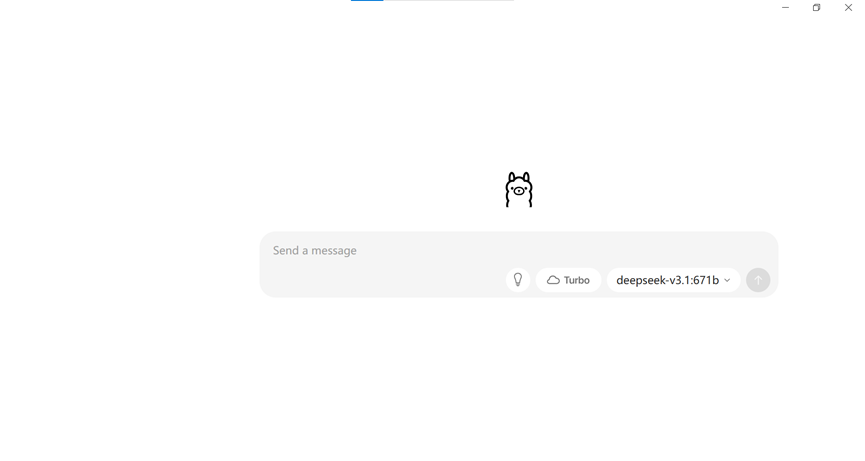
a. On your own computer, open a web browser (such as Chrome).
b. In the address bar, enter: http://<your_public_IP_address>:8080
c. The first time you visit, it will ask you to create an administrator account. After creating and logging in, you will see an interface similar to ChatGPT, and you can start chatting with your privately deployed DeepSeek model!
At this point, the entire deployment process is complete! You now have a high-performance large model service that you control yourself, accelerated by a GPU.
About RunC.AI
Rent smart, run fast. RunC.AI allows users to gain access to a wide selection of scalable, high-performance GPU instances and clusters at competitive prices compared to major cloud providers like Amazon Web Services (AWS), Google Cloud, and Microsoft Azure.